Selected Case Studies
Beyond Visible: UV-Visible Fluorescence in Works of Art
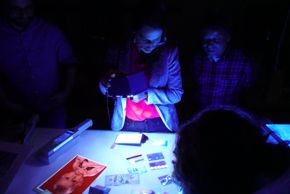
Jennifer McGlinchey Sexton uses a handheld ultraviolet lamp to examine photographs, currency, and ID cards during a workshop at the MFAH.
Left to right: A South American mask seen in normal light and UV-visible light
Currency and ID cards under UVA radiation
The top images of these two Ralph Albert Blakelock paintings (Afterglow on the left, Moonlight on the right) are the paintings shown using the new Target-UV™ tool.
Conservators use a variety of imaging techniques on works of art to gather information that can’t be seen by the naked eye. One option is producing florescence, or glow, with ultraviolet A light—the type of ultraviolet light with the longest wavelength. UVA light not only produces stunning visual effects, it can also provide valuable insight on an artwork’s structure, history, and more. I was invited by the MFAH conservation department to give a workshop to discuss making the technique of UVA radiation easier and more accessible to the Museum’s staff.
Many natural materials produce fluorescence when exposed to radiation from UVA light. The color and intensity of this florescence can range widely, which helps conservators and conservation scientists distinguish materials used in art. As you see in the photos in the image slideshow, UVA radiation can increase the visibility of coatings and old repairs. The technique also helps differentiate pigments used by artists and provide key information about past light exposure, which in turn provides clues about where the artwork came from and where it’s been.
UV-visible pigments are also used in security applications, such as passports, currency, and driver’s licenses. These pigments act as a security feature because they are difficult to counterfeit and can reveal manipulation of important information quickly, using simple tools.
Our workshop at the MFAH focused on using the new Target-UV tool to help conservation staff capture accurate records of UV-visible fluorescence. This accuracy allows the images to be meaningfully compared, understood, and re-created by other conservation professionals: a previously unattainable goal due to the nature of UV-visible fluorescence and differences in approach and equipment. The MFAH conservator of photographs provided important feedback for the development of this tool, which is now part of the Museum’s toolkit for conservation imaging.
An example of a recent MFAH project that uses this technology is in the evaluation of work by Ralph Albert Blakelock. The American artist is known for his technique of mixing oil paint and varnish layers continually while painting, so his finished works often have dark, atmospheric areas that display variations of matte and gloss that can be difficult for the viewer to distinguish. Only through examination with UV illumination can conservators see brushwork and details with total clarity, and using the UV target allows two of his paintings to be compared together without fear that different lighting conditions may have affected what the conservator can see and evaluate.
—Jennifer McGlinchey Sexton, conservator of photographs and works on paper in private practice
Invisible Forces: Mounting with Magnets
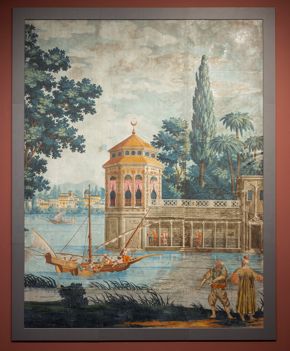
Dufour et Leroy, Panel from "Les Rives du Bosphore,” 1828, block-printed paper, the Museum of Fine Arts, Houston, the Bayou Bend Collection, gift of Miss Ima Hogg.
Cross views of the mounting strips
Preparators use a template to position wallpaper in the gallery.
Left to right: Preparators use a template to mark screw position; detail of template with screw holes marked; A preparatory drills screws into the gallery wall.
Conservators and preparators place edge strips to install the wallpaper.
Installation view of Contingent Beauty: Contemporary Art from Latin America, on view November 22, 2015 through February 28, 2016.
Back side of a folio with hanging system in place. The plastic strip has embedded magnets, secured in polyester pockets.
Installation view of Contingent Beauty: Contemporary Art from Latin America.
Left to right: The upper level of storage box shows plastic strips with embedded magnets secured with twill tape; The lower level of storage box shows removable trays holding folios with polyester clips and polyethylene strap.
Taking a cue from textile conservators, paper conservators at the MFAH have been investigating fabricating display mounts for works on paper using rare-earth magnets.
For works on paper, framing doesn’t always work as a presentation method, sometimes due to the artwork’s size or shape, the artist’s preferences, or the nature of the artwork. Using strong rare-earth magnets opens up new possibilities for exhibiting works on paper. Innovative, magnetic mount designs are reusable, easily installed, relatively inexpensive, and, with careful handling, safe for the art.
Below are two examples of our forays into this method of hanging works of art.
Dufour et Leroy, Panel from “Les Rives du Bosphore,” 1828
A wallpaper section from Ima Hogg’s personal collection, the artwork features a view of Istanbul from the Bosphorus Bay. The Art of the Islamic Worlds galleries feature rotating selections of works from other curatorial collections that dialogue with the Islamic works in the gallery, and this panel was selected for the June 2016 rotation, “Collections in Conversation: The Fantasy World of Turquerie.”
Using magnets to mount the panel allowed for a display that was closer to the original presentation, as the wallpaper spent many years installed in the music room in Bayou Bend. The magnetic mounting system, which is less expensive than framing, can be easily removed when the work is deinstalled and also covers up a non-original border around the wallpaper.
Magnets were used to hold the panel in place around the edges by attaching to metal screws drilled into the wall. Some 40 rectangular magnets were needed to safely support the wallpaper’s weight. The magnets were embedded into eight mat board strips that were pieced together, one at each corner and one at each edge.
We made a template of the strips at the edges, indicating the locations of the magnets and the edges of the artwork. This gave the Museum’s preparations team the exact locations of where screws needed to be drilled in the display wall, and it also assisted the curator in determining the layout of other artworks during gallery installation.
Once the template was completed, a beveled mat, which was segmented to match the eight edge strips, was attached to the top of the embedded magnet strips to conceal the magnets and give the appearance of a typical mat.
The template made installation simple and straightforward. During installation, two members of the preparations team held the artwork in place over the screws in the wall, and the conservators worked together to place the magnet-embedded edge strips in the correct locations according to the template. Finally, a stanchion was placed in front to protect the unglazed artwork.
Johanna Calle, Perímetros (Urapán), 2012
In preparation for the 2015–16 exhibition Contingent Beauty: Contemporary Art from Latin America, paper conservators at the MFAH used magnets to develop a mounting system to display Johanna Calle’s Perímetros (Urapán), a 12-part assemblage of typed text on ledger book pages, or folios, that come together to form a tree when positioned on a wall.
The artwork is large and irregularly shaped, making custom framing expensive and difficult. Additionally, the artist’s vision of the work called for an intimate, immediate experience that traditional framing and glazing would interrupt. The magnet mounting system provided a clean, invisible aesthetic, and it was also constructed to be reusable for future display without significantly increasing storage space.
The conservators embedded rare earth magnets into thin strips of rigid, transparent plastic that is inert and chemically stable. These strips slid into acid-free, spunbonded polyester pockets that were affixed to the back of each of the 12 folios with reversible heat-activated BEVA 371 adhesive film.
Using a template with holes drilled in the same locations as the magnet-embedded strips, the preparations team drilled metal screws into the display wall. When installed, the rare-earth magnets attached to the metal screws, affixing the folios safely and securely to the wall. The folios were hung along the top edge, allowing the bottom of the sheet to hang freely—a preference of both the artist and curator. When deinstalled, the plastic strips were removed, the pockets were kept on the verso of the work, and all components were stored in a compact storage housing constructed from common archival storage materials.
—Tina C. Tan, Rachel Vogel, Christina Taylor
Endangered Animal? Assessing the Light Sensitivity of Walton Ford’s “Oso Dorado”
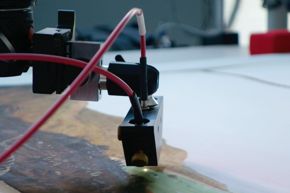
Close-up of the light beam of the microfade tester.
The research scientist calibrating the microfade tester.
Left to right: Advanced conservation intern Heather Brown, works on paper conservator Tina Tan, and research scientist Cory Rogge discuss the artist’s palette.
Walton Ford, Oso Dorado, 2013, watercolor, gouache, ink, and graphite on paper, Museum purchase funded by “One Great Night in November, 2013.” © 2013 Walton Ford. Courtesy the artist and Paul Kasmin Gallery.
During data collection.
Walton Ford, Oso Dorado, 2013, watercolor, gouache, ink, and graphite on paper, Museum purchase funded by “One Great Night in November, 2013.” © 2013 Walton Ford. Courtesy the artist and Paul Kasmin Gallery.
Menil Collection staff members Tom Walsh, Adam Baker, and Tobin Becker (L to R) moving the unframed Oso Dorado to a workbench.
Works of art on paper are often subject to irreversible light-induced damage, a dilemma for institutions that wish to both display the works to the public and preserve them for future generations. A large modern watercolor, Oso Dorado by Walton Ford, was acquired by the Museum of Fine Arts, Houston, at “One Great Night in November 2013,” the same year the painting was created.
When the work is so new, it is in a pristine, unfaded condition. A conservative approach to preserving it in this state would be to carefully regulate its light exposure by controlling exhibition light levels and frequency. The Museum uses an established set of exposure guidelines that are successful at preserving works of art on paper; however, they are not necessarily the optimum for any single work and limit how often an object can be on view and enjoyed by the public.
In the 1990s, Paul Whitmore, a scientist at Carnegie Mellon University, created an instrument known as a microfade tester that uses a very small (0.4 mm) and very intense beam of light to slightly fade an area of color in a work of art. The fading rate of the color is compared to the fading rate of three different swatches of blue-dyed wool whose light sensitivity is known. This comparison allows scientists to predict how much light a work of art can be exposed to before beginning to fade.
The MFAH does not own a microfade tester. However, a neighboring institution, the Menil Collection, does. The two institutions agreed to collaborate, and Oso Dorado was transported from the MFAH to the Menil, where MFAH paper conservator Tina Tan and Cory Rogge, Andrew W. Mellon Research Scientist at the MFAH and the Menil Collection, tested the lightfastness of 12 different areas of Oso Dorado. All of the colors tested showed relatively gradual rate of fading, indicating that the artwork is stable. Rogge further analyzed pigments in Oso Dorado with X-ray fluorescence spectroscopy and confirmed that the artist used watercolor containing inorganic pigments, including cadmium red, cadmium orange, cadmium yellow, umber, bone/ivory black, iron earth red, iron earth yellow, carbon black, titanium white, zinc white, calcium carbonate, and barium sulfate. This information helps the conservators and curators decide how long, under what light levels, and how often Oso Dorado may safely be exhibited.
—Tina C. Tan, Heather Brown
The Ceramic Robotics of Clayton Bailey
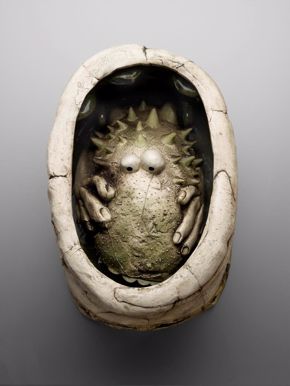
Clayton Bailey, Monster (“Burping Bowl”), 1977, ceramic, the Museum of Fine Arts, Houston, the Leatrice S. and Melvin B. Eagle Collection, Museum purchase funded by the Caroline Wiess Law Accessions Endowment Fund. © Clayton Bailey
Interior of the head before cleaning, showing the original silicone caulk and the cement fill in the center to balance the head, creating the right equilibrium to produce the burp.
Clayton Bailey, Monster (“Burping Bowl”), 1977, ceramic, the Museum of Fine Arts, Houston, the Leatrice S. and Melvin B. Eagle Collection, Museum purchase funded by the Caroline Wiess Law Accessions Endowment Fund. © Clayton Bailey
Clayton Bailey, Monster (“Burping Bowl”), 1977, ceramic, the Museum of Fine Arts, Houston, the Leatrice S. and Melvin B. Eagle Collection, Museum purchase funded by the Caroline Wiess Law Accessions Endowment Fund. © Clayton Bailey
Interior of the head after cleaning.
California artist Clayton Bailey has devoted his career to comedy, science, and pseudoscience through the medium of ceramics. His 1977 work Monster ("Burping Bowl"), part of the Eagle Collection of contemporary American decorative arts at the MFAH, is a cross between a pond-dwelling sci-fi monster and the childhood nightmare of someone living in the toilet bowl. A head rests in a bowl of water, and air is pumped under the cavity of the head by an aquarium air pump. When enough air builds up, the head lifts up in the water and releases the air with a burp.
When the object came into the Museum’s collection, it had been separated from its original pump, and it was unclear where the water level should be. The short piece of plastic-covered steel wire used as a hinge to affix the head in the bowl was significantly corroded and deteriorated. Additionally, there had been some damage to the bottom edge of the head, which—although not visible when the object was assembled—could potentially affect the working sounds of the object. Garden debris had soiled the surfaces of the object, and the copper tube that allows air to be pumped into the interior of the head had been blocked with soil. After cleaning, a new pump and a new piece of copper electrical wire for a hinge were purchased, and the object assembled. Through experimentation, a variety of sound patterns could be produced, largely dependent upon water level. The sharp sound of ceramic against ceramic was determined to be undesirable, and a few dots of latex-silicone were added to places where the old silicone cushion had been lost.
When the water level was higher, the burp was louder and longer, and the intervals between burps longer, whereas lower water levels produced burps smaller and more frequent, with a sound more akin to a burbling fountain. Given the artist’s predilection for objects eliciting shock and amusement, the first was more likely to be his preference. However, larger burps produced a larger radius of spray, which would constitute a slipping hazard for visitors. A middle ground of moderate burps and minimal spray was decided on for displaying Monster ("Burping Bowl") in the exhibition Beyond Craft: Decorative Arts from the Leatrice S. and Melvin B. Eagle Collection.
Behind the Seams: Invisible Stabilization for an Early 19th-Century Embroidery
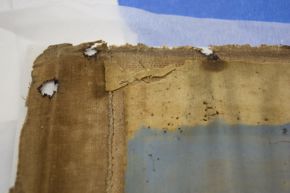
The upper left corner with broken areas of silk fabric.
Unknown American artist, Memorial Embroidered Picture, c. 1805–15, silk, linen, gouache, the Museum of Fine Arts, Houston, the Bayou Bend Collection, gift of William J. Hill.
A one-to-one print was made of a photograph to provide a guide for painting the dye. A sheet of Mylar was taped on top of the photo to provide a good surface, and the net taped to the table on top of that.
Unknown American artist, Memorial Embroidered Picture, c. 1805–15, silk, linen, gouache, the Museum of Fine Arts, Houston, the Bayou Bend Collection, gift of William J. Hill.
The net pinned to the board for stitching.
Unknown American artist, Memorial Embroidered Picture, c. 1805–15, silk, linen, gouache, the Museum of Fine Arts, Houston, the Bayou Bend Collection, gift of William J. Hill.
When dry, the net was unrolled over the embroidery on its padded muslin covered mounting board.
Unknown American artist, Memorial Embroidered Picture, c. 1805–15, silk, linen, gouache, the Museum of Fine Arts, Houston, the Bayou Bend Collection, gift of William J. Hill.
The net was then rolled in plain newsprint and steamed over a pan of boiling water for an hour. After steaming, it was rinsed to wash away any excess dye.
Unknown American artist, Memorial Embroidered Picture, c. 1805–15, silk, linen, gouache, the Museum of Fine Arts, Houston, the Bayou Bend Collection, gift of William J. Hill.
The object before treatment, with broken threads scattered across the surface.
Unknown American artist, Memorial Embroidered Picture, c. 1805–15, silk, linen, gouache, the Museum of Fine Arts, Houston, the Bayou Bend Collection, gift of William J. Hill.
Several acid dye colors were mixed in water and painted onto the net, blotting with a paper towel to keep the color from bleeding into adjacent areas.
Unknown American artist, Memorial Embroidered Picture, c. 1805–15, silk, linen, gouache, the Museum of Fine Arts, Houston, the Bayou Bend Collection, gift of William J. Hill.
The silk fragments repositioned before laying the net down.
Unknown American artist, Memorial Embroidered Picture, c. 1805–15, silk, linen, gouache, the Museum of Fine Arts, Houston, the Bayou Bend Collection, gift of William J. Hill.
The finished mount. The net is visible on close inspection, but not noticeable at a normal viewing distance.
Unknown American artist, Memorial Embroidered Picture, c.1805–15, silk, linen, gouache, the Museum of Fine Arts, Houston, the Bayou Bend Collection, gift of William J. Hill.
After the death of George Washington in 1799, a fashion for fine silk needlework memorializing Washington, or a family member of the embroiderer, swept through upper-class American circles.
Executed by schoolgirls as an expression of refinement and learning, a beautiful needlework like Memorial Embroidered Picture in the Bayou Bend Collection would have been displayed in the family home as an artwork as well as a diploma certifying a girl’s completion of her schooling and readiness for marriage. Unlike most 19th-century samplers, which were generally silk thread on a linen ground fabric, these embroidered pictures were done in silk thread on a thin silk ground that provided a fine-grained surface for paint. When the girl had finished her embroidery, a painter would use gouache to create, in this case, the sky; the distant landscape; the oval portrait of Washington; and the head, arms, and foot of the female figure Columbia (the personification of the United States).
The thin silk ground means that memorial embroideries are often more deteriorated and more vulnerable to loss than linen ground samplers, and this circa 1805–15 Bayou Bend textile by an unknown American maker is no exception. There are several splits in the silk fabric, and many of the long satin stitches are broken at one or both ends. Like other textiles, works on paper, and photographs, the picture was displayed on a rotating schedule for long-term preservation; it had not been displayed since 1996.
As there is a linen backing to the embroidery—which meant that any stabilization had to happen from the front—many possible treatments would not work. With stitching, consolidation, and adhesive stabilization from the back all impossible, stabilization with a net overlay was planned instead. A fine nylon net, made in England on a 19th-century loom, was chosen for softness, fineness, ease of use, and ability to be dyed.
The embroidery could be sandwiched between a padded muslin-covered mounting board and this net overlay, which would be stitched to the mount with enough tension to hold the broken stitches and the shattered silk fabric in place. The white nylon net, however, would be visible to the viewer. Dyeing the net to a uniform mid-tone brown would give a less noticeable appearance than white, but it would still dull the darkest and lightest areas of the picture.
Instead, a method of painting the dye on the net with a brush and setting it with steam was used to create an overlay that would be the right color in the right place, letting the original work shine through.
Illumination in the Lab
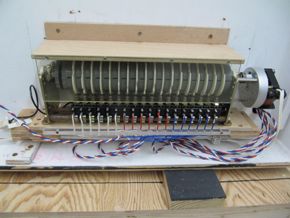
Electronic element driving the illumination sequence of Espaces chromatiques carrées en spirale. © Estate of Gregorio Vardanega, courtesy Sicardi Gallery, Houston
Interior of Espaces chromatiques carrées en spirale. © Estate of Gregorio Vardanega, courtesy Sicardi Gallery, Houston
Gregorio Vardanega, Espaces chromatiques carrées en spirale (Chromatic Spaces Turning in a Spiral), 1968, Plexiglas, light bulbs, and motor, the Museum of Fine Arts, Houston, Museum purchase funded by the Latin Maecenas. © Estate of Gregorio Vardanega, courtesy Sicardi Gallery, Houston
Espaces chromatiques carrées en spirale (Chromatic Spaces Turning in a Spiral) consists of 6 white, painted plywood panels illuminated by 63 small light bulbs, set into a black box. The 1968 kinetic sculpture is the work of Gregorio Vardanega, an Argentinean artist who worked in Paris. One-third of the bulbs are covered with red plastic cylinders and one-third are covered with blue, leaving the other third uncolored. A vintage electronic component designed by the artist drives the illumination of the bulbs in a complex sequence, creating a vibrant dance of colors and patterns.
During examination in preparation for the MFAH exhibition Constructed Dialogues: Concrete, Geometric, and Kinetic Art from the Latin American Collection, it was discovered that 49 of 63 of the bulbs did not light up. As sometimes corrosion on the metal connections can cause old, little-used bulbs to fail, even though they are not yet dead, the first treatment attempt was to remove the bulbs, clean the connectors with an abrasive nylon pad, and try again. Unfortunately, the situation did not improve—the bulbs were, indeed, dead.
It is a general principle of conservation that original material should be preserved at all costs, which sometimes means that change in the appearance of an object must be accepted to maintain its essential authenticity. However, in the case of electronic, kinetic, and light-based art, it may also be said that if these elements are not working, the object no longer exists. Preservation of the artist’s essential idea and vision therefore becomes far more important than the preservation of the original material. New, working bulbs are more authentic than original, non-working bulbs.
After considerable search, dead stock vintage light bulbs of the same shape, wattage, and voltage were ordered from France. It was essential that the glass dome be the same shape, despite not being visible to the viewer, because there was a risk that a larger shape might bring the heat of the bulb closer to the colored plastic sleeves and deform them. All 63 bulbs were replaced to ensure a homogenous appearance (although no difference in the quality of light between new and old bulbs was visually discerned) and to ensure a consistent electrical load.
Sometimes conservation is as simple as replacing a light bulb.
The Prints of Antonio Berni
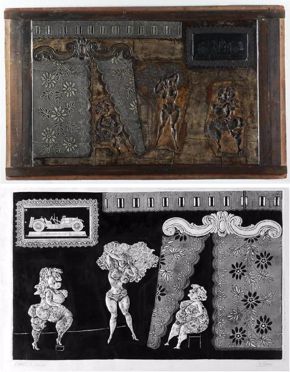
Top: Antonio Berni, El exámen de Ramona o El exámen (Ramona’s Exam or The Exam), 1966, xylo-collage-relief, Private Collection, Buenos Aires. © José Antonio Berni
Bottom: Antonio Berni, Woodblock for El exámen de Ramona o El exámen (Woodblock for Ramona’s Exam or The Exam), no date, wood, metal, and plastic, Private Collection, Buenos Aires. © José Antonio Berni
Left: Antonio Berni, Ramona en España (Ramona in Spain), 1964, xylo-collage-relief, Private Collection, Buenos Aires. © José Antonio Berni
Right: Antonio Berni, Woodblock for Ramona en España (Woodblock for Ramona in Spain), no date, wood, metal, plastic, putty, and textiles, Private Collection, Buenos Aires. © José Antonio Berni
2003.409 Don Juan amigo de Ramona, after treatment raking light (l) and transmitted light (r), showing the dense areas where patches were added to the verso during printing.
Antonio Berni, Don Juan, el amigo de Ramona o Don Juan, el pretendiente (Don Juan, The Friend of Ramona or Don Juan, Pretender), 1963, xylo-collage, the Museum of Fine Arts, Houston, Museum purchase funded by Alfredo and Celina Hellmund Brener. © Sucesión Lily Berni
EX.2013.AB.138 El Striptease de Ramona. Paper conservator Tina Tan releasing the print from mount with a heat tool.
Antonio Berni, Ramona en el cabaret o Ramona bataclana (Ramona at the Cabaret or Ramona the Showgirl), c. 1964, xylo collage, Collection of Gail and Louis K Adler, Houston. © José Antonio Berni
EX.2013.AB.154. Lifting nails out of a print to release it from the frame.
Antonio Berni, Torero o Torero en pose (Bullfighter or Bullfighter Posing), 1964, xylo-collage, Collection of Gail and Louis K. Adler, Houston. © Sucesión Lily Berni
EX.2013.AB.141 Sin título, during surface cleaning.
EX.2013.AB.141 / Sin título, during matting and framing.
EX.2013.AB.141 Sin título, detail of the window mat and spacer.
Antonio Berni, La lectura (The Reading), c. 1977, xylo-collage-relief, Collection of Gail and Louis K. Adler, Houston. © Sucesión Lily Berni
Argentinean artist Antonio Berni coined the term xilo-collage-relief, a combination of traditional woodcut and collagraph printmaking techniques, to define his high-relief prints made during the 1960s and 70s. Berni’s working method consisted of first incorporating carved wooden blocks with other elements, such as coins, metal hardware, and molds made of dental plaster, to build a collage, and then sealing the plate with varnish or lacquer to keep it from sticking to the printing paper. The paper sheet was soaked in water for 15 to 20 minutes to soften it before it was pressed and molded into the negative space of the plate. In areas of high relief, the paper would sometimes break, requiring Berni to add “patches” of paper with glue onto the verso. Paper fibers were sampled by MFAH conservation scientist Corina Rogge and identified as primarily chemically processed wood pulp, which explains why the fibers are short and prone to breaking. Once the sheet was dry, Berni would stuff the verso of the print with sawdust and cover with layers of rubber and felt to create a flat plane for additional pressing and inking. In total, the print was re-registered and pressed up to 4 or 5 times, resulting in an image made up of black ink background and cream paper highlights. The colored inks were likely hand-applied as a final step to the process.[1]
Working with Berni’s xilo-collage-reliefs during conservation and framing posed a unique challenge since most works on paper are two-dimensional and ink is often the only material raised from the surface. In order to flip these prints over for photography or treatment, blocks were built from stacks of blotter paper and rigid polyethylene foam to raise the corners up to the same height as the relief. The majority of conservation treatment was needed to address previous housings that were causing the paper to become brittle and discolored. Steps included removing the prints from acidic substrates, like Masonite and foam-core board, cleaning the surface with block erasers, and reducing tape and synthetic adhesives using a combination of mechanical action, heat, and solvents. One print was nailed directly to its frame and the nails had to be pried out with a metal spatula before the holes could be mended with Japanese paper and wheat starch paste. In order to re-frame the pieces for display, window mats were constructed with multiple laminates of matboard (up to 1 ½ inches) to keep the glazing from touching the print. Each print was then sealed around the back and sides with Marvelseal aluminized nylon and polyethylene barrier film to provide protection from water vapor, pests, pollution, and other environmental factors and, finally, fit into a new frame.
The ultimate goal of conservation and framing was to restore the prints to their original intended appearance using preservation-minded materials and techniques. The resulting artworks are considerable in weight and dimensions, but now these 66 high relief prints are ready for display and long-term storage.
[1] Antreasian, G. 1979. 3 Argentine printmakers: styles and techniques at the Latin Print Triennial. Print News 1(6): 8–9.
—Tina C. Tan
Virgin and Child
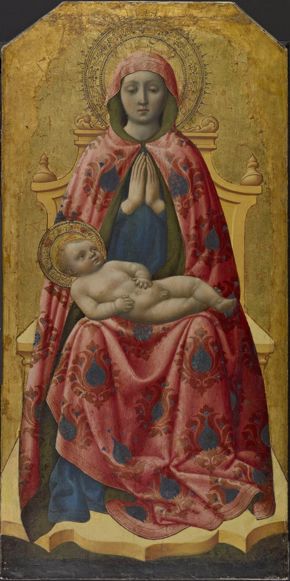
Before treatment.
Ultraviolet Flourescence illustrating damaged areas.
During treatment in a cleaned state.
Framed after treatment.
Comparison before and after treatment; detail of child.
Antonio Vivarini's devotional image Virgin and Child (c. 1440) was originally painted with traditional methods including a gessoed panel, water gilding and punchwork, tempera paint layers, and oil gilding details. Over time many changes have occurred. Almost all of the oil gilding has worn away altering the rich appearance of the Virgin’s robe and centuries of dirt were caked into the delicate gold background. Most significantly the original wooden panel was entirely removed in the 1970s. As the wood aged it began to shift causing cracks in the painting. Efforts to stop this process were unsuccessful and eventually the only millimeters thick painting was painstakingly transferred to a new modern honeycomb panel.
Over the past two years at the MFAH, the painting has undergone another treatment. For probably the first time since it was created, the punchwork was meticulously cleaned using eye surgery scalpels under a microscope, bringing renewed brilliance to the gold details. In the past the edges of the panel were extended, changing the shape of the base of the throne. Before the most recent treatment the perspective was too high, causing the Virgin and child to appear to tip out of the picture plane. This area was reworked without covering any original paint, to more closely match what would have been the composition of the artist. Many of the damages were minimized and the delicate glazes recreated; this allows the viewer to focus on the image as created by the artist, rather than the alterations created over time.
